1. Introduction
Welding cast aluminum is a routine repair and fabrication task in automotive, marine, aerospace and industrial settings — but it is materially different from welding wrought aluminum. Successful repair requires the right decision up front, disciplined preparation (cleaning, preheat, fit-up), appropriate process and filler selection, controlled heat input, and targeted inspection. This guide explains the metallurgy, practical “how-to” steps, parameter guidance, common failure modes and advanced options so shops can produce reliable welds on castings.
2. What is cast aluminum?
“Cast aluminum” refers to components produced by pouring molten aluminum alloy into a mold where it solidifies.

Common families include:
- Al–Si casting alloys (A356, 319, A413, “silumins”) — widely used for engine blocks, housings and structural castings. High silicon content improves fluidity and reduces shrinkage but affects weldability.
- Die-cast alloys (often higher copper/Zn in die casting) — used for thin-wall consumer parts; limited weldability.
- Sand and investment castings — thicker sections and rougher surfaces; often require more preparation.
Cast alloys may be as-cast, heat-treated (e.g., T6 for A356), or contain trapped gases and shrinkage porosity from the casting process.
3. Why cast aluminium is different
Key welding challenges with castings:
- Porosity and shrinkage cavities: Entrapped gas or shrink voids are common; they act as stress concentrators and porosity sources for welds.
- Eutectic phases (high Si): Al–Si eutectic lowers the melting range and promotes hot/solidification cracking if heat input or filler selection is wrong.
- Variable section thickness / high thermal mass: Thick bosses conduct heat away; thin fins heat and cool rapidly. Differential cooling produces stresses and distortion.
- Pre-existing defects: Cracks formed during casting may extend into the weld if not prepared out properly.
- Heat treatment sensitivity: Many castings are precipitation-hardened (T6). Welding locally destroys the temper; restoration may require full heat-treatment (solution + re-age), often impractical for repairs.
Understanding these constraints is the first step toward a sound repair strategy.
4. How to decide whether to weld a casting
Feasibility checklist (yes/no quick assessment):

- Is the defect localized (crack, small porosity) rather than pervasive? — If localized, welding is often feasible.
- Can you access and grind back to sound metal and create a proper weld groove? — If no, replacement may be required.
- Can the assembly be preheated and clamped to control distortion? — Preheat improves success.
- Will the welded area be in a highly stressed, safety-critical location (pressure vessel, primary structural member)? — If yes, consider replacement or full qualification.
- Is the alloy identifiable (A356, 319, etc.) and is restressing/heat treatment an option? — Unknown alloy increases risk.
If any of these checks is negative for a critical part, replacement or non-weld repair solutions (adhesives, mechanical fastening) should be considered.
5. Preparation: cleaning, fit-up, joint design and preheat
Cleaning
- Remove oil, grease and paint using an alkaline degreaser or acetone.
- Remove the oxide layer and any surface contamination immediately before welding with a dedicated stainless-steel wire brush or abrasive wheel reserved for aluminum. Avoid carbon-steel brushes (iron contamination causes rust and embrittlement).
- Wipe with clean solvent and let dry.
Fit-up and joint design
- Grind out cracks to sound metal — prepare a V or U groove to fully penetrate the defect. Drill small “stop holes” at crack tips to prevent propagation.
- Provide adequate root access; for deep cracks, consider backing with a copper heat sink/backing bar to support the puddle and remove heat.
- Avoid overly constrained joints — some freedom reduces stress and cracking risk.
Preheat
- Preheat is strongly recommended for castings: 150–250 °C (300–480 °F) is a common practical range. Use thermocouples to monitor temperature.
- Preheat reduces thermal gradients, allows hydrogen to escape, and reduces the likelihood of hot cracking. Do not exceed ~300 °C for most Al–Si castings unless following a specific metallurgy plan — excessive preheat can soften the part or change temper.
Interpass temperature
- Keep interpass temperature below 250–300 °C to avoid metallurgical degradation and uncontrolled softening. Allow the part to cool to acceptable interpass temperature before continuing.
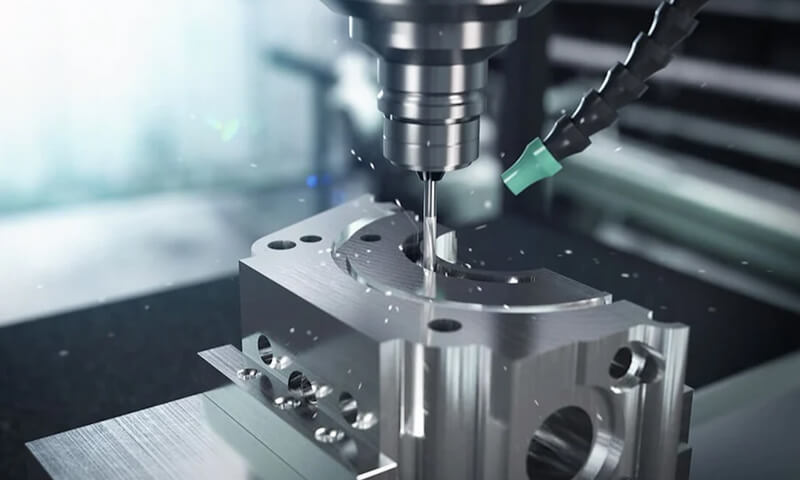
6. Welding Methods for Cast Aluminum
Choosing the right welding method for a cast-aluminum repair is one of the single most important decisions you’ll make. The method determines heat input, distortion risk, deposition rate, accessibility, joint appearance and most of the downstream inspection requirements.

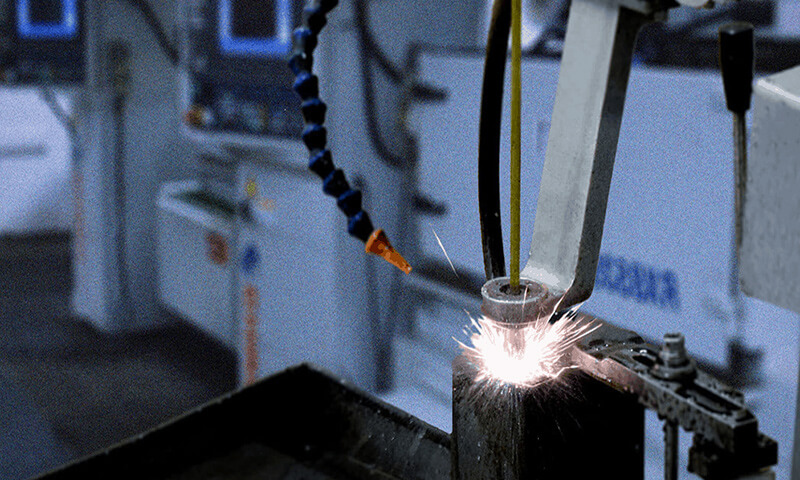
TIG (GTAW) — AC Aluminum Welding
When to use: small localized repairs, thin walls, cosmetic finishes, tight control required.
Why it works: AC mode alternates electrode polarity to break the Al₂O₃ oxide (cleaning) and provide weld penetration; TIG gives precise heat control and excellent puddle visibility.
Consumables: ER4043 (default for Al–Si castings), ER5356 where strength/corrosion needed; 2% zirconia or 2% lanthanated tungsten for AC; 99.999% argon shielding.
Technique tips:
- Short arc length, deliberate arc travel; dip filler into leading edge of puddle.
- Use weld-stitching/back-stepping to control heat; avoid long continuous beads.
- Balance setting: increase electrode-positive % briefly for cleaning, then reduce for penetration.
Pros: best visual control, lowest risk of blow-through on thin areas when used properly.
Cons: slow deposition; operator dependent.
MIG (GMAW) — Spool gun / Push-pull / Pulsed MIG
When to use: thicker castings, production environments, large repairs where speed matters.
Why it works: higher deposition rates; pulsed mode reduces average heat input and improves puddle control. Spool guns avoid aluminum wire feeding problems.
Consumables: solid ER4043 / ER5356 wires; argon or Ar/He mixes. Wire diameters commonly 0.9 mm (0.035″), 1.2 mm (0.045″) or 1.6 mm (0.062″).
Technique tips:
- Use pulsed transfer on manual or robotic systems to reduce porosity and spatter.
- Use spool gun or push-pull feeder; aluminum wire must be kept dry and feed smoothly.
- Keep shielding gas flow 12–20 L/min; use Ar/He for thicker sections to increase penetration.
Pros: fast; good for multi-pass builds.
Cons: higher heat input than TIG, requires correct wire feed setup to avoid birdnesting and porosity.
Pulsed MIG & Hot-wire MIG
When to use: when you need higher deposition with better heat control than conventional MIG. Hot-wire preheats filler wire electrically before entering puddle, lowering required arc energy (reduces HAZ).
Benefits: faster deposition, lower total heat per mass deposited, improved control of bead shape.
Applications: medium–thick to thick castings where distortion must be limited.
Laser Welding & Laser–Arc Hybrid
When to use: high-value repairs, precision localized welding, areas where minimal HAZ and distortion are critical. Hybrid systems combine arc filler capability with laser penetration.
Why it works: high power density allows deep penetration with narrow welds and low overall heat input.
Notes: often used with pre-placed filler or autogenous mode; parts must be fitted and fixtured precisely. Best performed in specialized shops.
Pros: minimal post-weld machining, low distortion.
Cons: capital cost, joint fit-up critical, limited access for large castings.
Electron Beam (EB) Welding
When to use: specialized, small-batch, critical repairs or production where extreme weld quality and deep penetration are required. Requires vacuum chamber.
Pros: extremely low porosity, deep fusion, small HAZ.
Cons: vacuum requirement, high capital & limited part-size practicality.
Friction Stir Repair (FSR)
When to use: when the casting geometry allows a rotating FSW tool to process along a defect (e.g., linear cracks on accessible surfaces). Produces solid-state joints with no fusion porosity.
Pros: excellent mechanical properties; no filler required in many cases.
Cons: tooling and fixturing complexity; tool access and part clamping limit applicability; not applicable for internal cavities.
Brazing / Torch Repair
When to use: thin-wall non-structural components, decorative repairs or where fusion welding is undesirable. Brazed joints use aluminum brazing alloys (with flux) and lower temperature.
Pros: low heat input, simple equipment.
Cons: much lower joint strength than fusion welds; flux residues must be removed; not suitable for structural repairs.
Comparative table
| Method | Typical thickness range | Approx. deposition rate | Typical consumables | Control / Quality | Pros | Cons |
| TIG (AC GTAW) | 0.5–6 mm (single pass) ; multi-pass to ~12 mm | ~5–60 g/min (hand) | ER4043 / ER5356; 2% Zr/La tungsten; Ar gas | Very high | Excellent heat control, ideal for thin sections and cosmetic finishes | Slow, operator skill critical |
| MIG (GMAW) — spool gun / push-pull | 2–25+ mm | ~200–800 g/min | Solid wire ER4043/ER5356; Ar or Ar/He | High (with pulsed) | Fast deposition, good for thicker repairs | More heat input, need proper wire feed; risk of porosity if not set up |
| Pulsed MIG / Hot-wire MIG | 2–20 mm | ~300–1,000 g/min (hot-wire higher) | Same filler | High | Reduced heat input per unit deposition; improved control | More complex equipment |
| Laser / Laser-arc hybrid | 1–20 mm (localized) | ~50–300 g/min | ER4043/ER5356 filler (if used) | Very high | Very low HAZ, low distortion, deep penetration | High capital cost; specialized skill |
| Electron Beam (EB) | 1–50 mm (vacuum) | Variable | Special filler or autogenous | Very high | Exceptional weld quality and penetration | Vacuum required; specialized facility |
| Friction-Stir Repair (FSR) | 3–20 mm (geometry dependent) | Solid-state, high joint integrity | None (tool steel shoulder/ pin) | Very high | No fusion porosity; robust metallurgical properties | Requires heavy tooling; not for complex cast internal shapes |
| Brazing / Torch | thin walls, non-structural | N/A (braze filler flow) | Aluminum brazing alloys, flux | Low | Simple equipment, low heat input | Weak joint vs fusion weld; limited structural use |
7. Consumables & shielding: filler alloys, electrode choices, gas & wire sizes
Filler alloys
- ER4043 (Al–5Si): Widely used for Al–Si castings (A356, 319). Good fluidity, less tendency to hot-crack. Conservative default for most cast-aluminum repairs.
- ER5356 (Al–5Mg): Higher strength and better corrosion resistance (especially marine). Use cautiously on high-Si castings as it can increase cracking sensitivity.
- ER2319 / ER3125 etc.: Specialty fillers for specific alloys/conditions. Check manufacturer recommendations.
TIG electrodes
- 2% zirconia (Zr) or 2% lanthanated tungsten recommended for AC aluminum welding. Zirconiated gives stable arc on AC. Thoriated (2% ThO₂) not ideal for AC and has radiological concerns.
Shielding gas
- Argon (99.995%) standard. Flow: 10–20 L/min (20–40 SCFH) depending on nozzle size.
- Argon/Helium blends (e.g., 75/25 Ar/He) increase heat input and wetting for thicker sections — useful when more penetration is required; helium increases cost and may require higher flow and attention to oxidation.
Wire diameters (MIG)
- Common sizes: 0.8 mm (0.030″), 0.9 mm (0.035″), 1.2 mm (0.045″) and 1.6 mm (0.062″). Choose smaller dia for thin sections and better control; larger for heavy deposition.
8. Welding Technique and Tips
TIG (AC) technique
- Use AC with appropriate balance (polarity %EN/EP) — more electrode positive (EN) increases cleaning action but reduces penetration; balance for oxide removal and penetration.
- AC frequency (60–120 Hz) tightens arc and improves control on small welds.
- Use a short arc length and maintain consistent torch angle (usually 10–15° drag or push depending on technique).
- Add filler by dipping into the leading edge of the puddle; avoid overheating.
MIG technique
- Use a spool gun to minimize feeding issues. Keep push angle, control travel speed to avoid porosity. Pulsed MIG helps limit heat input and improves wetting control.
Puddle management
- Castings have uneven cooling. Control heat input: shorter runs (stitch welding) with pauses between stitches let heat dissipate and avoid long continuous beads that build up stress.
- Backstep technique and alternating passes reduce distortion.
Peening
- Historically used to reduce residual tensile stresses and cracking risk. Today peening is used sparingly because it can introduce other defects and is not a substitute for correct process selection.
Backing bars / copper backing
- Use copper backing to cool puddle and support root; also aids in heat dissipation and reduces burn-through.
9. Post-weld handling: cooling, stress relief, repair grinding and PWHT considerations
Cooling
- Allow controlled cooling to ambient; avoid water quench. Rapid cooling increases thermal shock, residual tensile stress and cracking.
Stress relief
- For critical welds a low-temperature stress-relief bake (e.g., 150–200 °C for 1–2 hours) can reduce residual stresses — but check alloy compatibility.
Repair grinding
- Dress welds smoothly to remove undercut or overlapping beads; maintain rounded transitions to avoid notch stress concentrators.
PWHT and age-restoration
- Many castings are precipitation-hardened (e.g., A356 T6). Welding locally destroys the T6 temper. Restoring full mechanical properties may require solution heat treatment (~530–540 °C), quenching and artificial aging (~155–180 °C) — processes that often demand complete part dismantling and are seldom practical for large castings. If full strength is required, plan for replacement or full heat-treatment after welding.
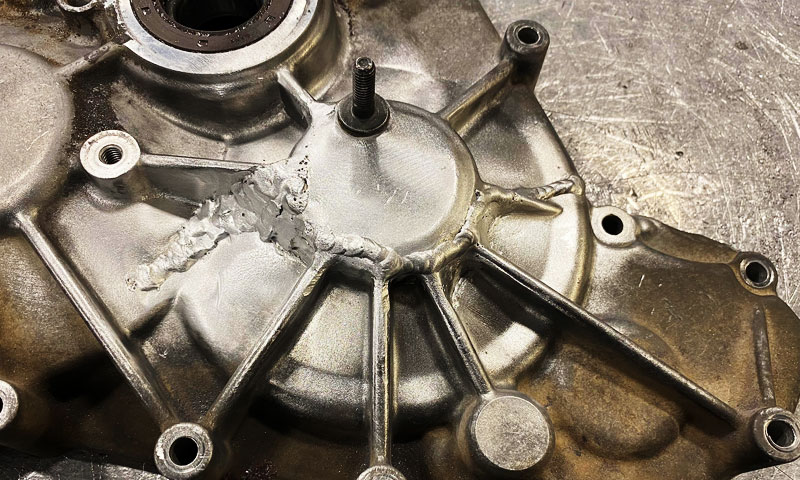
10. Common defects, root causes and remedies
| Defect | Typical cause(s) | Remedy(s) |
| Porosity | Moisture on surface/filler, inadequate shielding, trapped gases, hydrogen | Clean thoroughly; dry wire; maintain shielding gas coverage (12–20 L/min); preheat to allow gas escape; peen small porosity before next pass if acceptable |
| Hot / solidification cracking | High restraint, incompatible filler, high heat input, rapid cooling | Use ER4043 for Al–Si castings; preheat (150–250 °C); stitch welding; reduce restraint; control heat input |
| Lack of fusion / incomplete penetration | Low heat, oxide under bead, poor fit-up | Increase heat/amps, clean oxide, adjust joint prep for access and penetration |
| Burn-through / thinning | Excessive heat, thin section | Reduce current, increase travel speed, use backing bar, use pulsed TIG/MIG |
| Oxide inclusion | Inadequate cleaning, contaminated brush | Clean with stainless brush immediately before welding; remove debris between passes |
| Crack propagation | Failure to grind out crack ends; too-rapid cooling | Drill stop-holes, grind to solid metal, preheat, stitch-weld to relieve stress |
11. Inspection, testing and acceptance criteria

Visual inspection
- Check for uniform bead profile, no undercut, no surface cracks, acceptable porosity levels.
Dye penetrant
- Good for finding surface cracks and lack-of-fusion indications.
Radiography (X-ray)
- Effective for detecting internal porosity and shrinkage cavities in thicker repairs — used where structural integrity is critical.
Ultrasonic testing (UT)
- Useful on thicker castings to detect subsurface flaws.
Pressure / leak testing
- For housings that carry fluids, a hydrostatic or pneumatic pressure test may be the final acceptance.
Hardness mapping and mechanical testing
- Where mechanical properties are critical, extract test coupons or perform hardness surveys and, if possible, tensile tests on representative splices.
12. Advanced Welding Techniques
- Laser welding / hybrid laser–arc: Very low heat input and deep penetration — ideal for precision localized repairs, minimizing distortion. Requires prepared edges and specialized fixturing.
- Electron beam (EB) welding: Ultra-high energy density in vacuum — excellent for small, critical repairs in thick castings when performed in specialized facilities.
- Friction stir repair (FSR): Emerging technique; produces defect-free solid-state joints but requires access and tooling for FSR tool.
- Robotic pulsed-MIG with synchronized preheat: For production environments, automated pulsed MIG with controlled preheat and cooling delivers repeatable results for large series of repairs.
13. Step-by-step quick procedure (workflow checklist)
- Identify alloy & evaluate repair feasibility.
- Remove paint, corrosion and grease; clean with solvent.
- Grind out defects to sound metal; create appropriate groove geometry.
- Preheat casting to 150–250 °C (monitor with thermocouple).
- Select filler (ER4043 default for Al-Si castings; ER5356 where strength/corrosion requires).
- Setup machine: TIG AC with zirconia/lanthanated tungsten; argon shielding 12–20 L/min; set amperage per table above.
- Brush oxide immediately before welding; start weld with tack sequence and stitch pattern to control distortion.
- Make weld passes with controlled interpass temp (<250–300 °C). Keep bead profile smooth.
- Allow controlled cool to <100 °C before removing clamps.
- Post-weld inspection: visual, dye-penetrant, pressure or radiography as required.
- If required, perform PWHT or re-age (only if planned and feasible).
14. Conclusion
Weld cast aluminum is a technical discipline that demands precision in preparation, consumable selection, and technique—but the rewards are substantial: reduced scrap rates, extended component life, and 40–60% cost savings vs. replacement.
The core principles are consistent across applications: eliminate moisture and oxide, match filler alloy to base metal, control heat input to prevent cracking, and validate quality with standardized inspections.
By following AWS D1.2 standards, leveraging data-driven parameters, and addressing cast aluminum’s unique challenges (porosity, high thermal conductivity), welders can achieve defect-free, structural sound welds.
Whether repairing automotive engine blocks, industrial pumps, or aerospace components, this guide provides the technical foundation to master cast aluminum welding.
FAQs
Which filler should I use for A356 repairs?
ER4043 (Al–5Si) is the conservative choice for Al–Si castings. ER5356 (Al–5Mg) can be used when higher strength or better corrosion resistance is required, but may increase cracking sensitivity in high-Si castings.
Can I restore T6 strength after welding?
Welding locally destroys T6 temper. Full restoration requires solution treatment (~530–540 °C), quench and artificial aging (~155–180 °C), which is often impractical.
Evaluate whether the repair must be re-treated or the part replaced.
Is TIG always better than MIG?
TIG offers superior control for small, precise repairs. MIG (with spool gun or pulsed mode) is faster and more productive on thicker sections. Choose based on joint size, accessibility and production needs.
Can I weld cast aluminum with steel filler metal?
No—steel filler causes galvanic corrosion (corrosion rate increases by 10x) and brittle intermetallic compounds (weld strength <100 MPa). Always use aluminum filler (AWS A5.10).
Can I weld cast aluminum in cold weather?
Yes—preheat the component to 100–120°C and protect the weld area from drafts (use a wind screen) to maintain shielding gas coverage.
What is the maximum thickness I can weld with TIG?
TIG welding is effective for 1–12 mm thickness. For thicker sections (>12 mm), use multi-pass TIG with preheating or switch to MIG welding for higher deposition rates.
How to repair a cast aluminum component with clustered porosity?
Grind out the porous area to solid metal (verify with ultrasonic testing), clean thoroughly, and weld with ER4047 filler (high fluidity) to fill the cavity—multiple passes may be required.