

Few mechanical problems are as frustrating as a stripped screw. It often happens at the worst possible moment—during a repair, an assembly, or a disassembly that should have taken minutes.
The screwdriver spins uselessly, the head is chewed up, and the fastener refuses to budge.
What follows is often a cascade of improvised solutions, some of which damage the workpiece, the surrounding components, or the person holding the tool.
This guide explains the practical mechanics behind stripped-screw removal, from initial inspection through advanced extraction methods.
1. What Is a Stripped Screw?
A stripped screw is a fastener whose drive features—the slot, cross, hex, or other recess—have been damaged to the point where the driving tool can no longer transmit sufficient torque to turn it.
Stripping can affect the head (the drive recess), the threads, or both. In common usage, “stripped screw” usually refers to a damaged drive recess, while a “stripped thread” refers to damaged threads in the hole or on the screw itself.

2. Assess the Screw Before Trying to Remove It
Before applying additional torque, first assess the screw, the workpiece, and the likely cause of failure.
Correct identification helps prevent further damage and determines whether a simple driver technique or a more aggressive extraction method is appropriate.
| Assessment Point | What to Check | Why It Matters |
| Drive type | Phillips, Pozidriv, slotted, hex, Torx, Robertson, or security drive | The wrong driver can cause rapid cam-out and further stripping |
| Recess condition | Slightly rounded, partially damaged, severely damaged, or completely destroyed | Determines whether the original drive can still transmit usable torque |
| Head position | Protruding, flush, or recessed | Affects whether pliers, extractors, or drilling can be used |
| Assess access | Can you reach the screw with the tools you have? Is there room for a drill, an extractor, or a rotary tool? Is the screw in a confined space? | Restricted access may limit the removal method |
Screw material |
Stainless steel, carbon steel, brass, aluminum, or other alloys | Material affects strength, deformation, galling, and drilling behavior |
| Workpiece material | Steel, aluminum, plastic, wood, composite, etc. | Determines the allowable force, heat, and chemical exposure |
| Corrosion or thread locker | Rust, oxidation, white corrosion products, or visible locking compound | Indicates that excessive thread resistance may be contributing to the problem |
| Failure consequences | Risk to threads, sealing surfaces, precision components, or expensive assemblies | Helps determine how conservative the removal process should be |
Identify the Drive and Recess Condition
Start by confirming the exact drive profile and selecting a properly matched bit. Examine the recess under good lighting; magnification can be useful for small fasteners.
A slightly damaged recess may still accept the correct driver, whereas a severely rounded recess may require an extractor or another removal method.
The position of the head is equally important. A protruding head may allow gripping with pliers or locking pliers, while a flush or recessed head generally provides less mechanical access.
Consider the Screw and Workpiece Materials
The materials of both the fastener and the component being joined influence the extraction strategy.
Stainless steel fasteners can be susceptible to galling, while softer materials such as brass or aluminum can deform under excessive torque.
Similarly, aluminum, plastics, and finished surfaces can be damaged by aggressive drilling, high heat, or unsuitable penetrating products.
Check for Corrosion or Seizure
A stripped drive is not always the only problem. Rust, galvanic corrosion, contamination, or thread-locking compounds can substantially increase the torque required for removal.
In these situations, simply applying more force to the damaged recess may cause the screw head to deteriorate further.
Consider the Consequences of Failure
Before escalating to drilling or cutting, consider what happens if the operation goes wrong.
Screws installed in precision assemblies, pressure-containing equipment, fuel systems, or expensive components may require a more controlled approach because damage to the surrounding material can be more costly than the fastener itself.
Prepare the Appropriate Tools
A basic extraction setup may include a correctly sized driver, penetrating lubricant where appropriate, hammer, pliers or locking pliers, screw extractors, left-hand drill bits, a center punch, and a rotary tool.
Safety glasses should be worn whenever impact, cutting, or drilling operations are involved.
3. How to Remove a Slightly Stripped Screw
A slightly stripped screw is one where the recess is still mostly intact but the driver tends to slip.
This is the easiest situation to resolve, and the least invasive methods should be tried first.
Use the Correct Driver
The first step is to verify that the driver matches the screw exactly.
For Phillips screws, use the correct Phillips size; for hex fasteners, select the exact metric or imperial size. The bit should seat fully in the recess without excessive side-to-side movement.
A worn, undersized, or incorrect bit reduces the contact area and increases the likelihood of further stripping. Replacing a damaged driver bit is often enough to restore reliable engagement.
Apply Firm Axial Pressure
Press the driver firmly toward the screw while turning it slowly. Maintaining axial pressure keeps the bit seated and helps prevent cam-out, particularly when the recess has already suffered minor deformation.
Use controlled, gradual torque rather than a sudden or jerky movement. The objective is to maintain engagement throughout the initial breakout.
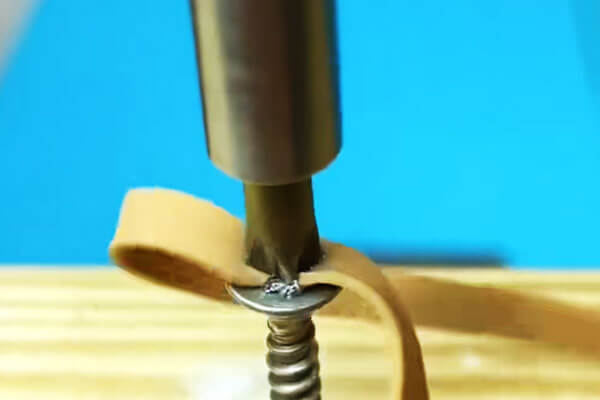
Improve Friction with a Rubber Band
For a mildly damaged recess, place a wide rubber band or similar high-friction material over the screw head and press the driver through it.
The material can fill small gaps between the driver and the damaged recess, increasing contact and friction.
This method is inexpensive and best suited to screws with limited surface damage. It becomes ineffective once the drive geometry is substantially destroyed.
Try an Alternative Driver Carefully
If the original driver continues to slip, another tool may provide better engagement.
Depending on the screw geometry, a different size or compatible drive profile may fit the remaining surfaces more effectively.
The alternative tool should still seat firmly and remain aligned with the screw axis.
Forcing an oversized or poorly matched bit into the recess can cause permanent damage rather than improve grip.
Add Abrasive Paste for Additional Grip
A small amount of fine abrasive or valve-grinding compound placed in the recess can increase friction between the driver and the damaged screw head.
This technique is particularly useful when the recess is slightly rounded but still structurally intact.
Use only a small quantity and prevent abrasive particles from entering sensitive mechanisms or sealing areas.
Seat the Driver with Light Tapping
For a screw with a partially rounded recess, lightly tapping the end of the driver with a hammer can help it seat more firmly.
This should be done with controlled force, especially when the screw is installed in aluminum, plastic, or another relatively soft material.
The purpose is to improve engagement, not to deform the screw head further.
Use Penetrating Lubricant When Resistance Is High
If the screw is tight because of corrosion, contamination, or friction in the threads, a suitable penetrating lubricant may reduce removal resistance.
Apply a small amount around the threaded area and allow sufficient time for penetration before attempting removal again.
Lubricant will not repair a stripped drive, but reducing the required breakout torque can make the remaining drive engagement sufficient for removal.
Turn Slowly and Maintain Control
Once the driver is properly engaged, apply torque slowly and steadily. Avoid power tools at this stage unless the application specifically permits them and torque can be carefully controlled.
If the driver continues to slip despite these measures, stop rather than repeatedly damaging the recess.
The screw has likely progressed from a slightly stripped condition to a moderately or severely stripped fastener, at which point an extractor, pliers, or controlled drilling technique may be more appropriate.
4. How to Remove a Moderately Stripped Screw
A moderately stripped screw has a drive recess that is substantially damaged but still provides some usable engagement.
A standard screwdriver may enter the recess but slip as soon as significant torque is applied.
At this stage, the removal method should create a new, more reliable mechanical interface rather than repeatedly using the damaged drive.
Cut a New Slot
If the screw head is accessible, cutting a new slot is a practical and reliable option.
Use a rotary tool with a thin cut-off wheel to form a straight slot across the head, then use a properly sized flat-blade screwdriver to turn the fastener.
The cut should be deep enough to provide secure engagement but not so deep that it weakens the head or reaches the surrounding workpiece.
Protect nearby surfaces from metal particles, sparks, and accidental contact with the cutting wheel.

Use a Screw Extractor
A screw extractor is specifically designed to remove fasteners with damaged drive recesses. For a conventional spiral-flute extractor, the general procedure is:
- Mark the center of the screw head, preferably with a center punch.
- Drill a pilot hole to the size recommended for the extractor.
- Insert the extractor into the pilot hole.
- Turn it counterclockwise with an appropriate handle or tap wrench so that the cutting flutes engage the screw.
- Continue applying controlled torque until the screw begins to rotate.
Extractor size should be selected according to the screw diameter and the manufacturer’s recommended pilot-hole size.
Drilling too large a hole reduces the remaining wall thickness available for the extractor to grip, while drilling off-center can damage the surrounding threads.
Try a Left-Hand Drill Bit
A left-hand drill bit rotates counterclockwise, the same direction normally used to loosen a screw.
As the bit cuts into the fastener, its cutting action can sometimes generate enough friction to turn the screw out without requiring a separate extractor.
This technique is particularly useful when the screw is damaged but not heavily seized.
It is often worth trying before moving to a dedicated extractor because the drilling and extraction functions can occur in a single operation.
Use Locking Pliers on an Exposed Head
When the screw head protrudes sufficiently above the workpiece, locking pliers can provide a direct mechanical grip.
Adjust the jaws so they clamp firmly around the head, then apply steady counterclockwise force.
This method works best when there is enough exposed head area for the jaws to grip without slipping. It is less suitable for flush-mounted or recessed screws.
Reshape the Screw Head
A damaged head can sometimes be converted into a new drive interface using a rotary tool.
Depending on the available space, the head may be reshaped into a slot, hex profile, or another usable geometry.
The new drive feature should have sufficient depth and parallel contact surfaces to transmit torque effectively.
Avoid removing excessive material from the head, particularly on small-diameter fasteners.
Apply Controlled Heat When Thread Locker Is Present
Heat can help when a screw is secured with a thread-locking compound. Depending on the specific compound and assembly, controlled heating can reduce its holding strength.
A practical range of approximately 100–150°C may be effective for some medium-strength thread-locking products, but the appropriate temperature should be based on the specific product data rather than treated as a universal value.
A heat gun or soldering iron generally provides better control than an open flame.
Before heating, consider nearby plastics, seals, coatings, wiring, lubricants, and other heat-sensitive components.
Combine Removal Methods When Necessary
Moderately stripped screws often respond best to a controlled combination of techniques.
For example, a corroded fastener may first benefit from penetrating lubricant, followed by carefully controlled heat where compatible, and then extraction with a left-hand drill bit or screw extractor.
The important principle is to reduce the torque required for removal while improving mechanical engagement.
If the recess continues to deteriorate or the extractor cannot obtain a secure grip, stop before causing further damage to the screw or the workpiece.
At that point, controlled drilling or complete fastener removal may be the more appropriate approach.
5. How to Remove a Severely Stripped or Recessed Screw
A severely stripped or recessed screw has a completely damaged drive recess, a broken or sheared head, or a head positioned below the surrounding surface.
At this stage, conventional screwdrivers are usually ineffective, and removal must be carried out with greater control to avoid enlarging the hole, damaging the surrounding material, or destroying the original threads.
Drill Out the Screw
When the drive is completely unusable, controlled drilling is one of the most dependable removal methods.

First, use a center punch to establish a precise starting point at the center of the screw. Drill a small pilot hole and then increase the drill diameter progressively.
Gradual enlargement provides better control and helps prevent accidental damage to the surrounding workpiece.
If the screw head separates from the shank, the joined components can usually be separated first. The remaining shank may then be removed with locking pliers or an extractor.
When necessary, the fastener can be drilled through completely, followed by inspection and repair of the original threaded hole.
For recessed screws, maintaining drill alignment with the screw axis is particularly important. Even a small angular deviation can damage the parent threads, especially in small-diameter holes.
Use an Extractor for a Broken Screw
When the screw head has sheared off, a conventional head-gripping method is no longer possible.
A broken-screw extractor can be used by drilling a suitable hole into the exposed shank and engaging the extractor with the remaining fastener.
The extractor should be selected according to the screw diameter and manufacturer’s recommended pilot-hole size.
Excessive torque should be avoided because a hardened extractor can itself break inside the fastener, creating a significantly more difficult removal problem.
Cut Off the Screw Head
When the head is accessible and the primary objective is to separate the assembled components, cutting the head off can be effective.
A rotary tool with a cut-off wheel, hacksaw, or suitable abrasive tool can remove the head, leaving the shank for later extraction.
This method is particularly practical when the fastener will be replaced and preservation of the screw itself is not important. Care must be taken to avoid cutting into the mating component.
Use a Plug Cutter in Wood
For wooden workpieces, a plug cutter can remove a small cylindrical section of material around the damaged screw.
The screw and surrounding material can then be removed together, after which the resulting opening can be repaired with a matching wooden plug.
This technique is mainly applicable to woodworking because it removes part of the surrounding material. It is generally unsuitable where the original surface geometry must remain intact.
Use a Die Grinder or Carbide Burr for Large Fasteners
For larger fasteners or heavily damaged heads, a die grinder or carbide burr can be used to remove the head or machine a new drive feature into it.
This approach provides considerable material-removal capability, but it also generates heat, debris, and a greater risk of damaging adjacent surfaces.
It should therefore be used with controlled tool movement and appropriate eye protection.
Consider EDM for Difficult Industrial Applications
In precision repair and machining environments, electrical discharge machining (EDM) can be used to remove broken screws, hardened fasteners, or even broken extractors.
Because EDM removes electrically conductive material through controlled electrical discharges rather than conventional mechanical cutting, it can be particularly useful when the fastener is difficult to drill or when preserving the surrounding threaded hole is critical.
The main limitation is accessibility: EDM requires specialized equipment and is generally not practical for routine field repairs.
Combine a Left-Hand Drill Bit with an Extractor
For a deeply recessed screw, a left-hand drill bit followed by a screw extractor can be an effective combination.
The drill rotates counterclockwise while cutting into the fastener, which may loosen the screw before an extractor is required.
This approach has the additional advantage of reducing the amount of manual intervention when the screw is damaged but not completely seized.
When Professional Extraction Is More Appropriate
Professional assistance should be considered when the fastener is located in a critical component, precision assembly, pressure-containing system, or high-value part, particularly when drilling could compromise the surrounding material.
A machinist or repair specialist may have access to precision drilling, EDM, thread-repair equipment, and specialized extraction tools.
In these situations, preserving the original bore and threads can be more important than minimizing the cost of the fastener itself.
The key principle for severely damaged screws is precision before force.
Once conventional engagement is lost, carefully controlled drilling, extraction, or machining is generally safer than repeatedly applying higher torque to an already damaged fastener.
6. Special Techniques for Corroded or Seized Screws
Corrosion and seizure can make a mechanically sound screw extremely difficult to remove.
Rust, galvanic corrosion, oxidation, or thread-locking compounds can create a strong bond between the fastener and the surrounding material.
In this condition, simply increasing torque often results in a stripped drive, sheared head, or broken shank.
The more effective approach is to first reduce the resistance at the joint and then apply controlled removal force.
Apply Penetrating Oil
A suitable penetrating oil can help reduce friction and loosen corrosion products around the threaded joint.
Apply the product around the exposed threads or the interface between the screw and workpiece, then allow sufficient time for penetration.
For heavily corroded fasteners, soaking for several hours or overnight may be more effective than repeated short applications.
Light vibration or gentle tapping during the soaking period can also help the lubricant reach tighter areas.
Not all penetrating products are suitable for every application. Check compatibility with plastics, coatings, seals, and other nearby materials before use.
Apply Controlled Heat
Moderate heating can help break corrosion bonds and, in some cases, soften thread-locking compounds.
A heat gun, soldering iron, or controlled torch may be appropriate depending on the assembly.
Temperature should be controlled according to the materials involved and the thread-locking product being used.
Some medium-strength thread-locking compounds begin to lose holding strength at temperatures around 100–150°C, but the manufacturer’s technical data should take precedence.
Avoid excessive heat, particularly around aluminum, polymers, electrical components, seals, coatings, and flammable materials.
Aluminum requires particular care because its melting point is about 660°C, substantially lower than that of steel.
Use Thermal Cycling
For severely seized fasteners, repeated heating and cooling cycles can sometimes be more effective than maintaining a constant temperature.
Expansion and contraction can slightly alter the contact conditions between the screw and the surrounding material, helping penetrate lubricant reach the threaded interface.
This technique should be controlled carefully to avoid thermal damage or excessive temperature gradients in precision components.
Use an Impact Driver
An impact driver applies short bursts of rotational force rather than sustained manual torque.
These brief torque impulses can help break corrosion bonds while reducing the tendency to continuously overload the damaged drive recess.
A manual impact driver struck with a hammer can be particularly useful because the impact force is applied directly along the screw axis while producing rotational movement.
Proper alignment remains essential to avoid damaging the head.
Apply Controlled Vibration
Vibration or light impact around the fastener can help fracture brittle corrosion products and reduce the mechanical bond at the threads.
A small mechanical engraver, controlled impact tool, or similar device may be used where appropriate.
The objective is not to damage the fastener or workpiece, but to disturb the corrosion layer enough to allow lubricant and rotational force to work more effectively.
Use a Suitable Rust Remover
For heavily oxidized steel fasteners, a rust-removal chemical may help dissolve corrosion around the joint.
Phosphoric-acid-based products and dedicated chelating rust removers are examples of approaches used for this purpose.
Chemical compatibility is critical. The product should be used strictly according to its technical and safety instructions, especially when the fastener is installed in aluminum, plated components, painted surfaces, or sensitive assemblies.
Use a Left-Hand Drill Bit
When the screw remains tightly seized after treatment, a left-hand drill bit provides another useful option.
Because the bit rotates counterclockwise, its cutting action can sometimes loosen the fastener and cause it to back out during drilling.
This method is particularly useful when the drive recess is already damaged and conventional tools can no longer generate sufficient torque.
Combine Methods Rather Than Increasing Torque
Corroded screws often respond better to a sequence of moderate interventions than to one aggressive operation.
A typical approach is to apply penetrating lubricant, allow time for penetration, introduce controlled heat or vibration where appropriate, and then attempt removal with a suitable driver or impact tool.
The key principle is reduce resistance before increasing torque.
Patience is often a technical advantage in corrosion-related fastener removal because rushing the process can convert a removable seized screw into a broken fastener requiring drilling or specialized machining.
7. How to Remove a Stripped Screw Without Damaging the Workpiece
When removing a stripped screw, protecting the workpiece should take priority over saving the fastener.
An inexpensive screw can be replaced, but damage to a machined surface, threaded hole, painted finish, or precision component may be difficult or costly to repair.
A controlled, progressive approach is therefore essential.
Protect the Surrounding Surface
Before using a drill, rotary tool, or impact device, cover the area around the screw with masking tape, cardboard, a protective cloth, or a suitable shield.
This helps prevent scratches, metal chips, and sparks from reaching finished surfaces.
For painted, polished, anodized, or otherwise sensitive surfaces, use protection that remains securely in place without interfering with tool access.
Center Punch Accurately
When drilling is necessary, establish the drilling point as close to the center of the screw axis as possible.
A center punch creates a small indentation that helps prevent the drill bit from wandering into the surrounding material.
Accurate centering becomes increasingly important as screw diameter decreases. An off-center hole can damage the original threads and make subsequent extraction more difficult.
Limit Drilling Depth
Use a drill stop or depth collar whenever possible. If dedicated equipment is unavailable, a visible depth reference can provide a basic safeguard, although it is less precise.
The drill should penetrate only as far as necessary for the selected extraction method.
Excessive depth can damage the component beneath the screw or compromise the original threaded hole.
Start with the Smallest Effective Tool
Use the least invasive technique capable of producing sufficient engagement.
For example, a correct driver should be attempted before drilling, and a left-hand drill bit may be preferable to immediately drilling the screw completely through.
Progressive escalation reduces the amount of material removed and gives you more opportunities to stop before the workpiece is damaged.
Control Heat During Drilling and Cutting
Drilling and cutting generate heat at the tool–workpiece interface. Excessive temperature can affect coatings, seals, plastics, adhesives, or heat-sensitive components.
Use an appropriate cutting fluid or lubricant when compatible with the material and process. It can reduce friction and heat generation while improving tool life and cutting consistency.
For assemblies containing sensitive components, heat shields or localized cooling may also be appropriate.
Secure the Workpiece
The workpiece should be held firmly so that it cannot move unexpectedly during extraction.
Movement can cause the driver, drill, or rotary tool to slip, increasing the risk of scratches, off-center drilling, or accidental cutting.
For precision components, stable fixturing is particularly important because even a small amount of movement can affect drilling alignment.
Maintain Good Visibility
Good lighting and, where appropriate, magnification make it easier to monitor the screw head, drill position, and surrounding surface.
This is especially useful for small fasteners, recessed screws, and components with tight clearances.
A clear view also allows you to detect changes in the screw or workpiece before a minor problem becomes permanent damage.
Know When to Stop
If the tool repeatedly slips, the drill begins to wander, the workpiece starts deforming, or the extraction force continues to increase without progress, stop and reassess the method.
Continuing to apply torque or cutting force after the technique has clearly failed is one of the most common ways to turn a stripped screw into a damaged threaded hole or workpiece.
For expensive, rare, safety-critical, or precision-machined components, professional extraction may be justified.
Specialized machining methods such as precision drilling or EDM can sometimes remove a damaged fastener while preserving the surrounding material more effectively than improvised methods.
8. How to Prevent Screws from Stripping
Preventing screw damage is generally more effective than removing a stripped fastener later.
Most stripping problems can be reduced through correct tool selection, controlled installation torque, suitable fastener design, and proper thread preparation.
Use the Correct Driver
Always match the driver type and size to the screw. The bit should seat fully and securely in the drive recess without excessive movement.
Worn or damaged driver tips should be replaced because poor engagement increases the risk of cam-out and recess deformation.
Apply Sufficient Axial Pressure
Keep the driver aligned with the screw axis and apply firm axial pressure while turning.
Good alignment helps maintain full contact between the driver and the recess, particularly when higher torque is required.
Control Installation Torque
Over-tightening is a major cause of fastener damage. Where a specified torque is available, use a torque wrench or torque-limiting driver rather than relying on excessive manual force.
The correct torque should always follow the fastener or equipment manufacturer’s specification.
Lubrication can significantly reduce thread friction, so applying a lubricant without adjusting the torque requirement can result in excessive preload.
Select High-Quality Fasteners
Use fasteners with appropriate material strength, dimensional accuracy, and properly formed drive features.
Poorly formed or relatively soft screw heads are more susceptible to deformation, especially under repeated installation and removal.
Use Appropriate Thread Lubrication
A suitable anti-seize compound, lubricant, or wax can reduce friction and help prevent corrosion-related seizure.
However, lubrication changes the friction characteristics of the threaded joint and may alter the relationship between applied torque and bolt preload.
For this reason, torque values specified for dry threads should not automatically be applied to lubricated fasteners.
Match the Screw to the Application Material
Fastener geometry should be compatible with the material being joined.
In relatively soft materials such as aluminum, plastics, and wood, the correct thread form, screw diameter, and pilot-hole size are important for achieving adequate engagement without damaging the material.
Where specified, pilot holes should be prepared to the recommended diameter rather than relying on excessive installation force to drive the fastener into the material.
Do Not Reuse Damaged Screws
A screw with a visibly damaged drive recess should normally be replaced rather than reused.
Even minor deformation can reduce driver engagement and increase the probability of further stripping during subsequent installation or removal.
Use Thread Locker Appropriately
Thread-locking compounds can help prevent loosening caused by vibration, but excessive or unnecessarily strong thread locker can increase removal difficulty.
Select the appropriate strength and application amount according to the service requirements and manufacturer’s instructions.
Consider More Robust Drive Designs
Where drive stripping is a recurring problem, the fastener design itself may need to be reconsidered.
Torx, hex, and socket-head designs generally provide more positive engagement than conventional Phillips drives and can be better suited to applications requiring higher installation torque or repeated servicing.
The choice should still be based on the required torque, available access, fastener dimensions, and service environment.
Maintain Drivers and Assembly Tools
Keep driver bits clean, properly seated, and free from excessive wear.
For production assembly, a torque-controlled or torque-limiting tool can provide much more consistent fastening than uncontrolled manual or power-tool operation.
9. Conclusion
Removing a stripped screw is a problem-solving exercise that rewards patience, preparation, and the right technique.
The key is to assess the situation carefully, start with the least invasive method, and escalate only as necessary.
Prevention is the ultimate solution. Using the correct driver, applying proper torque, choosing quality fasteners, and lubricating threads all reduce the likelihood of stripping.
When stripping does occur, having the right tools and a methodical approach turns a frustrating problem into a manageable task.
Whether you are a professional technician, a skilled tradesperson, or a determined DIYer, the principles in this guide apply. Assess, prepare, proceed methodically, and know when to seek help.
With the right approach, even the most stubborn stripped screw can be removed without damaging the workpiece or losing your patience.
FAQs
What is the easiest way to remove a stripped screw?
For a slightly stripped screw, start with the correctly sized driver and firm axial pressure.
Improving friction with a rubber band or abrasive compound may also help. Avoid immediately drilling the screw unless simpler methods fail.
Can a stripped screw be removed without drilling?
Yes. Depending on the damage, you can use a properly fitting driver, rubber band, alternative drive bit, locking pliers, a manual impact driver, or a newly cut slot.
These methods are most effective when part of the original screw head remains accessible.
What is the best tool for removing a badly stripped screw?
A screw extractor is one of the most commonly used tools for severely damaged screws.
For difficult or broken fasteners, left-hand drill bits, precision drilling, or EDM may also be appropriate.
Can WD-40 or penetrating oil remove a stripped screw?
Penetrating oil does not repair a stripped drive, but it can help when the screw is corroded, contaminated, or seized.
Reducing thread resistance may lower the torque required to remove the fastener.
How do you remove a stripped screw from aluminum?
Use a conservative approach because aluminum is relatively soft and can be damaged easily.
Maintain accurate alignment, avoid excessive torque, and use controlled drilling if necessary. Protecting the original aluminum threads should be a primary consideration.
How do you remove a stripped screw that is recessed below the surface?
Recessed screws are often difficult to grip directly. A left-hand drill bit and screw extractor combination can be effective, provided the drill can be centered accurately.
Careful depth control is essential to avoid damaging the surrounding material.
What should I do if the screw extractor breaks inside the screw?
Stop applying additional force. A broken extractor can be difficult to drill because many extractors are hardened.
Depending on the component and fastener size, precision machining or EDM may be required to remove the broken tool while preserving the surrounding threads.

